TO WORK
Painting the model.
The largest surfaces should
be painted first — for houses these will for the most part be
the walls and roofs, and for ships the hull and the deck. For
these larger surfaces use a bigger brush. The larger the brush,
the fewer strokes and consequently, the less `streaky' the
paintwork will be in appearance. Golden rule: always use the largest
possible brush appropriate for the work (this might also be a
very fine brush). When the surfaces have been painted, it is
recommended that they be left for two days to harden. If you do
not want to wait for two days we suggest you work on two
models at the same time. Begin glueing the second model while
you are waiting for the paintwork on the first to harden.
Ageing the model.
After the paint on the model
has hardened the ageing process can begin. These
instructions detail just three ageing techniques, while many dozens of
techniques and variations thereof exist. However, with these
three basic methods you will be able to achieve results which
are vastly superior to those of the pre-coloured modelling kits.
Before dealing with the three techniques in turn some
preliminary remarks should be made about the ageing process
in general.
Many factors play a role in influencing the way in which
you choose to age a model: its condition of upkeep, its age
etc. etc. If you examine real life examples you will observe
certain regularities in the patterns of ageing. You will also see
that there are many forms of pollution and that, for example,
old and new walls have very different textures. If a wall has
been whitewashed, then it is the age of the whitewash - rather
than the wall itself - that is the main factor determining its
appearance.
The techniques to be discussed are
1) the dry-brush technique,
2) the dirty terpentine technique, and
3) the stippling technique.
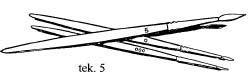
1: The dry-brush technique
Take a largish old paint brush and cut the hairs back so that
5 mm of bristle remains. This will give you a stiffer brush.
Then take a clot of, for example, white paint from the tin and dab
the ends of the prepared brush in the unthinned paint. The
brush must be completely dry. Then brush the paintbrush
against the board until it is virtually dry. Now lightly brush over
the irregularities of the model. This should leave white traces
on the irregularities (such as the joints). If the model
becomes dotted with flecks of white, then the brush is too wet; if
no traces of white remain, the brush is too dry. Here too it is
recommended that you first try this technique on a trial surface.
If it goes wrong on the model itself you can remove the
white flecks with terpentine. Now the importance of leaving the
paint to harden becomes apparent! Do not delay too long before
attempting to remove paint flecks and do not rub your brush
or cloth too long over the underlying paint layer, as this will
eventually dissolve. As the traces become more faded you will
have to apply fresh paint to your brush and repeat the
procedure described above. After you have practised this technique for
a while you will see that you can achieve good results.
The dry-brush work should be left to dry for around one hour.
2: The dirty terpentine technique.
Take a large brush with normal bristles and wet it
with terpentine. Dip the tips of the brush hairs briefly into some,
for example, green paint and subsequently mix the substance
on the board. Then quickly dip the brush — now covered in
green paint solution - back into the terpentine before brushing
the entire surface area to be treated with the dirty terpentine in
a single, broad stroke. The entire area should be wet. Do
not brush over the the wall area too often, as this will dissolve
the dry-brush traces. The terpentine flows into and over the
details, as it were, leaving a greenish deposit resembling
algae as it dries. If you have used matt paint then the coating
will also be matt. If the dirty terpentine leaves a gloss stain
then you can wet the affected parts with terpentine before
dabbing them dry with a dry cloth. Once again, it is advisable to first
try out this technique on a practice model.
The drying time for the dirty terpentine technique is
approximately one hour.
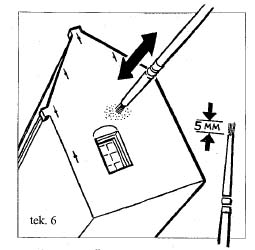
3: The stippling technique.
This method is specially intended for whitewashed and
rough-plastered walls. Stippling is applied over the top of the
desired base colour with which the walls have already been
painted. Dip the large brush you used for dry-brushing in
unthinned paint (usually white or cement coloured) and hold the
paint brush at right-angles to the object. Using the tips of the
bristles you can then stipple the whole surface of the wall.
(see fig. 6)
If details which need to be painted a different colour are
obscured by the stippling process you can remove the paint with
a brush that has been moistened with terpentine.
Painting details.
After the larger surfaces have been aged, the details can
be added. Larger details with a larger brush, smaller details
with a finer brush. Some details are easy to paint, others are
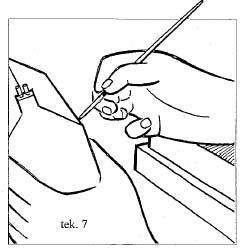
more difficult. A steady hand is important. For those who feel
they lack a steady hand, remember that the steadiness of your
hand is largely dependent on technique. A few tips: hold the
object steady with one hand and rest the side of the
painting-hand on a flat object such as a book. (see fig. 7)
Secondly, it also helps steady your hand if you hold your
breath when painting fine detail.
The frames and doors of a building are the most difficult
part of the detailing and require some additional comment.
When painting a frame you must not touch the wall, and when
painting a door you must not touch the frame.
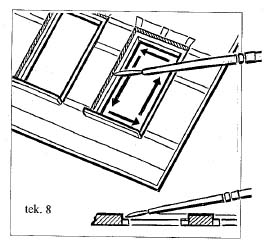
There are two golden rules:
1. Hold the object at a good angle and continually adjust
that angle. Painting a frame requires you to change the
angle four times.
2. Begin painting from one corner toward the next corner.
Then paint from the second corner to the third and so forth.
(see fig. 8)
After you have painted the upper side of the frame proceed to
the inside. If you use a good finely pointed brush you need
not touch the wall. (see fig. 8)
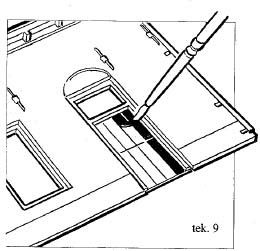
The procedure for painting doors is the same in
principle as for windows. In order to simplify the process you
could also choose to paint the inside of the frame the same
colour as the door. (see fig. 9)
Finally, after the paint has hardened, you can age the
details using techniques 1 and 2 described above. These tone
down the colours and flattens out the contrast, which enhances
the realism of the effect.